For system, network and cloud administrators

What you should know about VPNs
VPN stands for Virtual Private Network. Basically, it will allow you to access a private network. For example: you’re home and you are using your own network but you need to access the network of your work office. Well, that’s where a VPN connection will help you. Your work office will provide you the credentials of their VPN server so you can access their private network from wherever you are. This article aims to show you how you can create a VPN connection and connect to it.
Windows 10
- Press the Windows key (or click the Windows logo on bottom-left corner of your screen).
- Start typing “VPN”.
- Click “Add a VPN connection”.

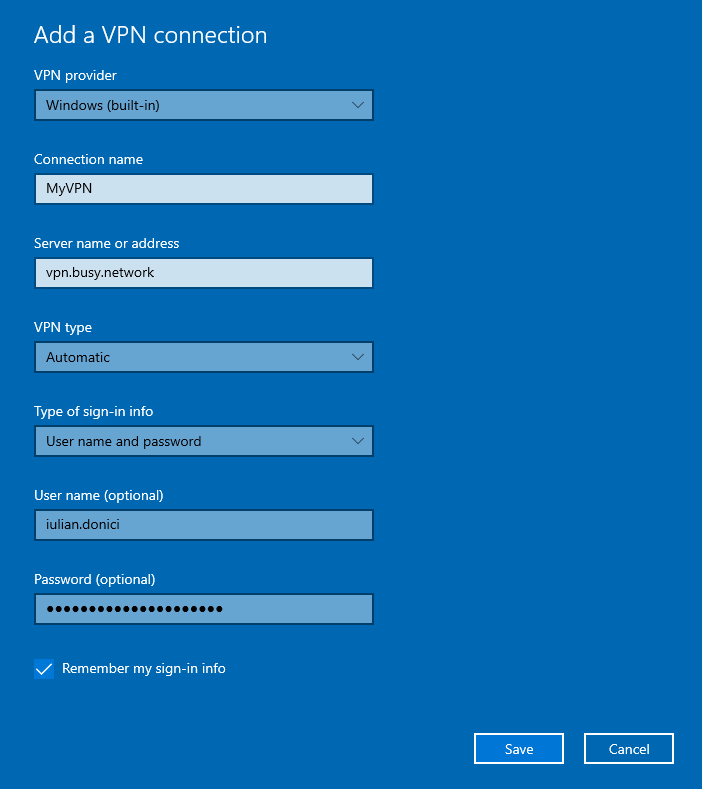
A new window should appear where you’ll have to configure your VPN connection.
- VPN Provider – choose “Windows (built-in)”.
- Connection name – make sure you type a name for your VPN that you can easily remember. In my case, I just called it “MyVPN”.
- Server name or address – type the server adress of the VPN. In my case, it’s vpn.busy.network.
- VPN type – it’s recommended that you choose “Automatic” and this way your Windows will automatically detect what type of VPN server you’re using.
- Type of sign-in info – choose “User name and password”.
- User name – even though this step is optional, most VPN servers (created by corporations who want you to be able to work from home, from your own computer) will require an actual username. In my case, it’s “iulian.donici”.
- Password – this step is optional also but like I mentioned above, you’ll most likely have to actually fill it in and use the password provided by your VPN provider.
- Once you’ve finished setting up your VPN connection, click “Save”.

- Connect to your VPN – your new VPN connection should appear in your bottom-right corner of your screen. All you have to do is click “Connect”.
