For system, network and cloud administrators

We sometimes find ourserlves in the position where we need to install a LAMP (Linux, Apache, MySQL, PHP) web server.
Ubuntu server 18.04
-
Install basic Ubuntu 18.04 server
If you’re not familiar with this, you can easily learn how to install Ubuntu server 18.04 LTS.
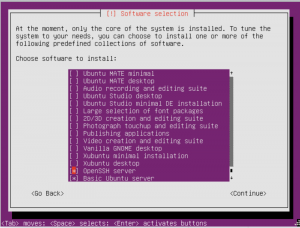
Ubuntu 18.04 LTS, basic server installation
-
Update Ubuntu 18.04
-
Install the Ubuntu UNZIP package:
-
Install Apache2 web server
-
Install PHP
-
View status web traffic for the Ubuntu server firewall
-
Allow web traffic through the Ubuntu server firewall
We’re going to make sure you have the latest version with all its updates by executing the code below in the terminal.
sudo apt-get update

sudo apt-get upgrade -y
sudo apt-get install unzip -y
sudo apt-get install apache2 apache2-doc -y
sudo apt-get install mysql-server php7*-mysql -y
sudo ufw app list
The “Apache Full” profile shows you if you have enabled or disabled web traffic through your Ubuntu firewall.
sudo ufw allow in "Apache Full"
The “Apache Full” profile allows web traffic to your HTTP port (80) and HTTPS (443).
sudo nano /etc/apache2/mods-enabled/dir.conf

sudo mysql

select user, authentication_string,plugin, host from mysql.user;

ALTER USER 'root'@'localhost' IDENTIFIED WITH mysql_native_password BY 'ThisMustB3aStrongPassword';

sudo mysql_secure_installation

sudo apt install php libapache2-mod-php php-mysql -y

sudo apt-get install php7.2-gd -y

sudo apt-get remove --purge mysql-server mysql-client mysql-common -y

sudo apt-get autoremove -y

sudo apt-get autoclean
Follow BusyNetwork
![]()
![]()
![]()
![]()
![]()
![]()